Tools are useful aides to help keep the person at the center of the PCP process. The use of tools is not mandatory. However, using tools can help facilitate conversation and ensure the focus remains on the person. It is important to note that completing the tools for the sake of completing the tools should never be the goal. The tools are designed to help with having interactive conversations and visually organizing thoughts and ideas.
There are many different tools that can be used in the Person-Centered Planning (PCP) process to help you discover, plan for, and assist a person in working toward their vision of a good life and enhance their voice, choice, and control. Tools can be used throughout all stages of the PCP process: pre-planning, during the PCP meeting, and post-planning. Tools can also be modified to meet the style of both the Support Coordinator and the person.
DSPD has identified certain tools to help you in the PCP process:
| Life Trajectory for Exploring | Life Trajectory for Planning | |
| Integrated Long Term and Support Needs | Life Domain Vision | |
| G ood Day / Bad Day | Employment Pathway Tool |
Some Charting the LifeCourse tools include separate versions for the person and their family. While the person’s voice and viewpoint must be the driving force of the planning process, other support team members - specifically family members - may also have thoughts and opinions they would like to express. Using separate tools for the person and family ensures that the perspective of all support team members is distinct.
Some of the Person-Centered Tools do not explicitly consider the person’s culture and language so it will be up to you as the Support Coordinator to ensure that it is addressed and taken into account.
Below are the instructions for accesing the Discovery Tools
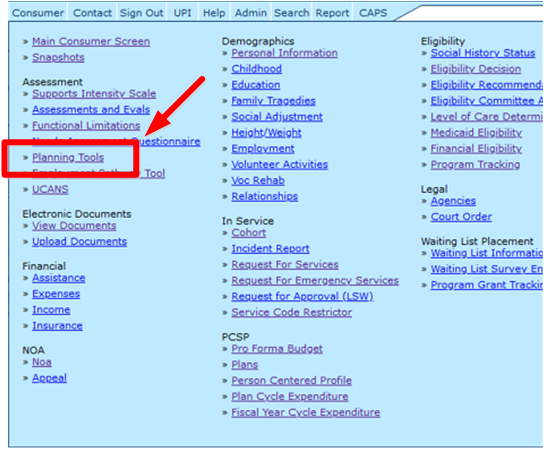
Select a person from the Home screen and go to the "Planning Tools" link in the Consumer Menu
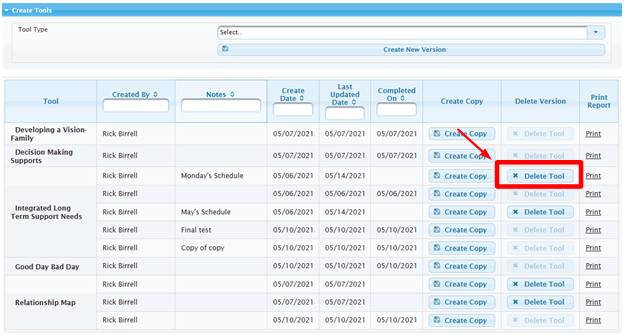
The main Planning Tools screen displays the history of tools that have been created. From this screen, you can start working on a new tool from scratch, copy an existing tool's content into a new one, delete a tool's content (under limited conditions) and print the tool as a PDF.
The first column identifies which tool it is.
The second columns identifies who created it.
The third column displays the notes/description the tool's author included with it.
The fourth column displays the date the tool was created.
The fifth column displays the date it was last updated.
The sixth column displays the date it was completed (finalized).
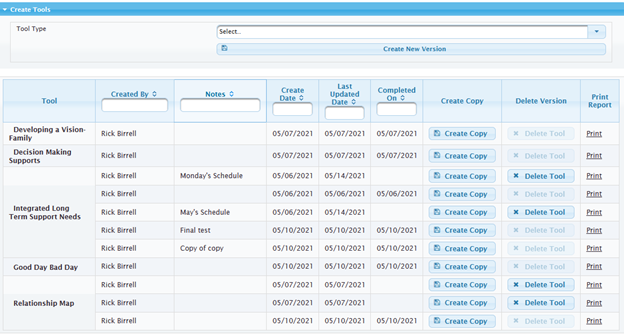
Creating a new, empty tool
Step 1: Click on the "Select" pull down list to view the list of tools and select one.
Step 2: Click on the "Create New Version" button.

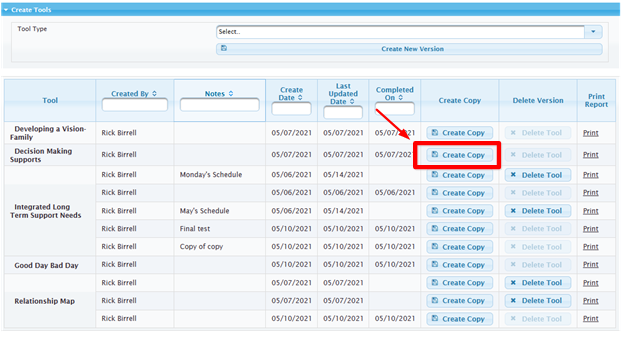
Copying a tool
Clicking on the "Create Copy" button creates a new instance of the tool and populates it with the content belonging to the one it was created from.
Deleting a Tool
In some cases, it may be helpful to delete a tool and start over. Deletion is a possibility in some cases depending on the tool's current status and who authored. For example, the tool can be deleted before it is finalized. If deletion is a possibility, the button remains active. However, when deletion is no longer an option, the button becomes grayed out.