Upload Invoice
Payment Upload File Requirements
When the provider is ready to upload the payment file, the must change it from a spreadsheet format to a comma separated value (csv) form. The change is done by simply saving the file as a "csv". The provider can choose to name the file whatever they whish. Even so, they should choose a naming convention that explicitly describes which time period the payments are for in order to keep their files straight from month to month.
For example, the convention could be any of the following formats:
providernumberMMDDYYYY.csv
MMDDYYYYProviderName.csv
ProviderNameYYYYMM.csv
YYYYMMProviderName.csv
The spreadsheet will display a csv file like it does any other spreadsheet data. However, if the csv is viewed from a text editor (such as Note Pad), the format is very different because the data is separated by commas, hence the name.
CSV File Example/Data Set
line_number,provider_approver_email,consumer_name,consumer_pid,service_code,rate,unit_type,units,service_start_date,service_end_date,remain_units
1,user@company.com,Person One,011111111,BC1,6.71,Q,7,4/1/2018,4/30/2018,42
2,user@company.com,Person Two,022222222,BC2,11.48,Q,34,4/1/2018,4/30/2018,3
3,user@company.com,Person Three,033333333,BC2,11.48,Q,12,4/1/2018,4/30/2018,0
4,user@company.com,Person Four,044444444,BC2,11.48,Q,8,4/1/2018,4/30/2018,19
Use MS Excel's "Save AS" feature to create the CSV file.
Step 1: Click on "Save As" in Excel's File menu.
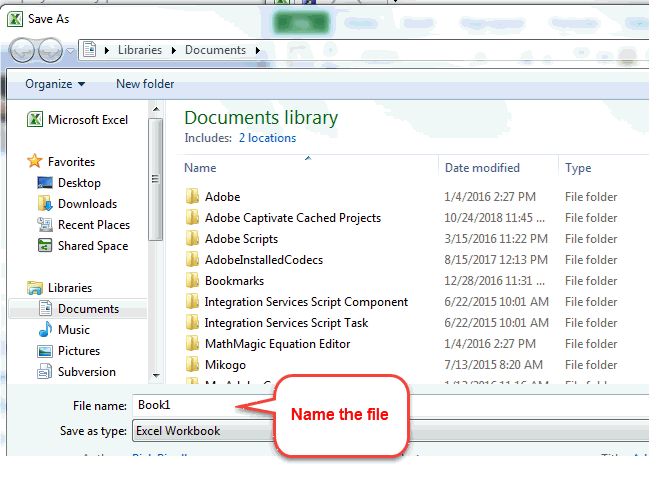
Step 2: Name the file (as indicated above, chose enter a name for the file that helps distinguish it from any other)

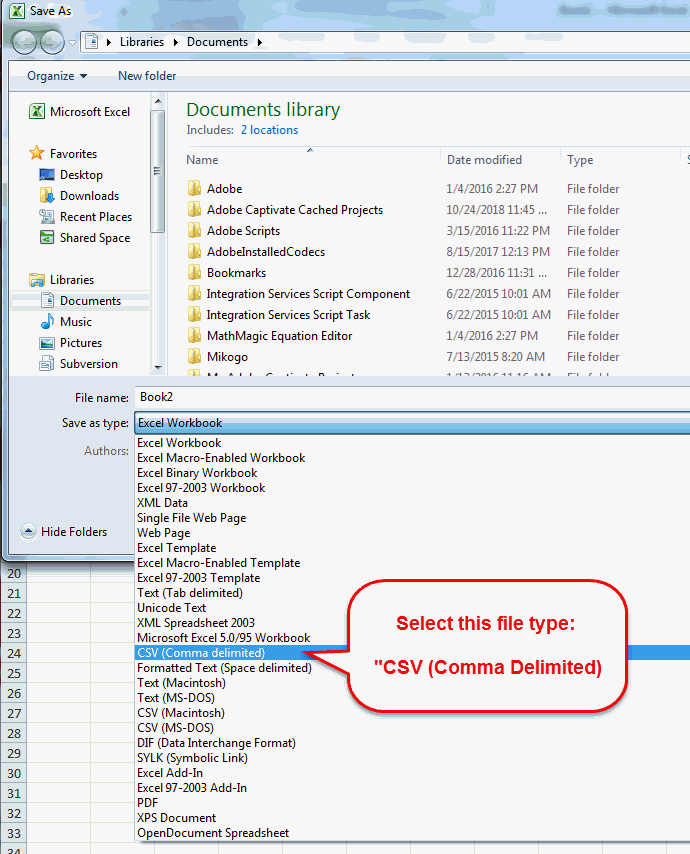
Step 3: Choose "CSV (Comma delimited)

Step 4: Select the location on the computer where the file will be saved. Then click on "Save" button.
Upload the CSV file to UPI
When the file is ready to submit, upload it.
1. Click on "Choose"

2. Use the navigation panel to find the file on the computer and select it.

3. Click on the "Upload and Save" button

[Note: if the wrong file was uploaded, click on the button with the red "x" to remove it.]
Before the file is formally loaded and processed, the submitter is given a confirmation box where they are required to certify the payments are accurate and delivered within the scope and requirements established by the Utah Department of Human Services. In order to formally submit the payments, the "Yes" button must be clicked. Otherwise, the "No" button can be clicked to abort the submission.

After the payment file is submitted, the data sits in a hopper until it is processed and validated by USTEPS and CAPS in order to confirm which payments are / are not acceptable. After the payments are processed, an email is sent to the address loaded in the payment file containing a summary of the results - meaning the number of records submitted, the number of records that passed the validation and the number that failed the validation.

Proceed to Pending Payments